


Axolotl Tank Cleaning Routine: A Simple Weekly Guide

Updated: Jul 23

A clean axolotl tank does not need to look freshly scrubbed every day.
In fact, cleaning too aggressively can disturb the beneficial bacteria that keep your aquarium safe and stable. The goal is not to make the tank sterile. The goal is to remove waste, control nitrate and maintain consistent water quality without disrupting the nitrogen cycle.
This Little Lotl’s axolotl tank cleaning routine explains what to do daily, weekly and monthly, along with the common cleaning mistakes that can cause water-quality problems.
Why Axolotl Tanks Need Regular Cleaning
Axolotls produce a surprising amount of waste.
Uneaten food, axolotl waste, decaying plant matter and debris can gradually break down into ammonia. In a properly cycled aquarium, beneficial bacteria process ammonia into nitrite and then nitrate.
Ammonia and nitrite should always remain at 0 ppm. Nitrate is less immediately toxic but must still be controlled through water changes, plant growth and regular maintenance.
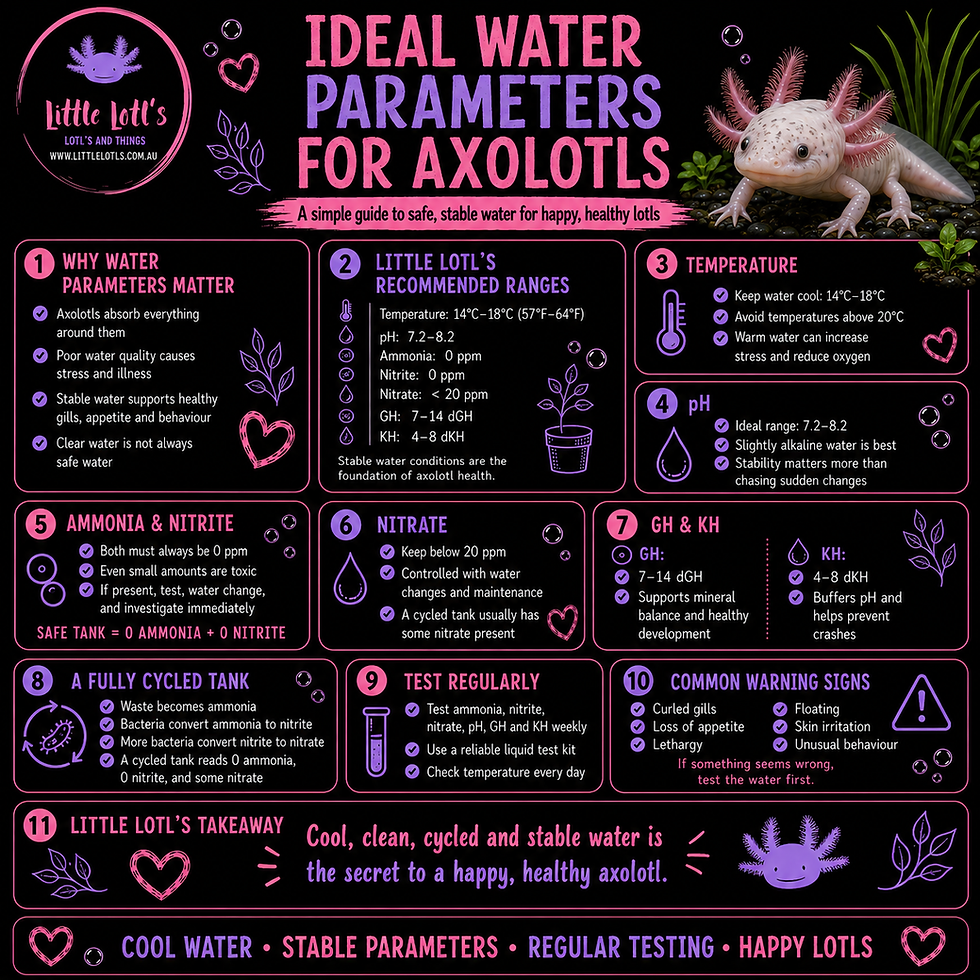
A stable axolotl tank should generally test within these ranges:
Temperature: 14°C to 18°C
pH: 7.2 to 8.2
Ammonia: 0 ppm
Nitrite: 0 ppm
Nitrate: below 20 ppm
GH: 7 to 14 dGH
KH: 4 to 8 dKH
Regular cleaning helps keep these parameters stable while making the aquarium healthier and more comfortable for your axolotl.
The Daily Axolotl Tank Cleaning Routine
Daily maintenance usually takes only a few minutes.
Remove Axolotl Waste
Use a turkey baster, pipette or small aquarium siphon to remove visible waste as soon as you notice it.
Axolotl waste can begin breaking apart quickly, especially if it is stepped on or disturbed. Removing it promptly reduces the amount of organic material entering the nitrogen cycle.
Remove Uneaten Food
Take out uneaten worms, pellets or food scraps after feeding.
Do not leave food sitting in the aquarium overnight. Rotting food can release ammonia and encourage bacterial growth.
A feeding dish or flat feeding stone can make leftover food easier to locate and remove.
Check the Temperature
Confirm that the aquarium remains between 14°C and 18°C.
Temperature can rise quickly during warm Australian weather, especially in rooms with direct sunlight or poor airflow.
High temperatures can stress axolotls, reduce dissolved oxygen and encourage unwanted bacterial growth.
Observe Your Axolotl
Tank cleaning is also a good opportunity to check your axolotl’s general condition.
Look for:
Normal appetite
Relaxed gills
A straight tail
Clear skin
Normal movement
No unusual swelling, redness or floating
No sudden changes in behaviour
Changes in appearance or behaviour may be an early sign of water-quality problems.
The Weekly Axolotl Tank Cleaning Routine
Most established axolotl tanks benefit from a partial water change and light cleaning every week.
The exact amount of water changed depends on the tank size, nitrate level, stocking level and filtration system.
Step 1: Test the Water
Test the aquarium water before beginning the water change.
Check:
Ammonia
Nitrite
Nitrate
pH
GH and KH should also be tested regularly, especially if your tap water changes seasonally or you are adjusting water hardness.
Testing before a water change gives you a clearer picture of what is happening inside the aquarium.
Step 2: Prepare Replacement Water
Prepare enough tap water for the planned water change.
Always treat new water with a suitable aquarium water conditioner that neutralises chlorine and chloramine.
Untreated tap water can harm your axolotl and damage the beneficial bacteria inside the filter.
Try to match the replacement water temperature as closely as possible to the aquarium temperature. Sudden temperature changes can cause unnecessary stress.
Step 3: Turn Off Electrical Equipment
Before lowering the water level, switch off equipment that may be damaged while exposed to air.
This may include:
Internal filters
Canister filter intake systems
Aquarium chillers
Heaters, if one is used temporarily
Water pumps
Air pumps can usually remain operating unless the airline or sponge filter will be disturbed.
Step 4: Remove Visible Waste and Debris
Use a turkey baster or aquarium siphon to remove waste from:
The tank floor
Beneath hides
Around plants
Near the filter intake
Inside feeding areas
Around decorations
Pay particular attention to areas with limited water circulation. These spots can collect uneaten food and waste.
Step 5: Siphon the Tank Floor
Bare-bottom tanks can be gently siphoned to remove loose waste and debris.
For tanks using fine sand, hold the siphon slightly above the surface. This allows lighter waste to be removed without collecting large amounts of sand.
Do not aggressively stir deep sand beds. Trapped debris should be managed carefully and gradually.
Gravel and small stones are not recommended for axolotl tanks because they may be swallowed and cause impaction.
Step 6: Complete a Partial Water Change
For many established axolotl tanks, a weekly water change of approximately 20% to 30% is a useful starting point.
However, the correct amount should be guided by your nitrate reading.
If nitrate is approaching or exceeding 20 ppm, a larger water change may be required. Continue testing and changing water as needed until nitrate returns to a safer level.
Avoid replacing all of the aquarium water during normal maintenance. Full water changes can create sudden shifts in temperature, pH and mineral content.
Step 7: Clean the Glass
Use an aquarium-safe algae pad or magnetic cleaner to remove algae from the glass.
Do not use household cleaning products, soap, disinfectants or glass cleaner anywhere inside the aquarium.
A small amount of algae is not normally dangerous, but excessive algae may indicate excess light, excess nutrients or an inconsistent maintenance routine.
Step 8: Refill the Aquarium Slowly
Add the conditioned replacement water gradually.
Pouring water onto a clean plate, bowl or decoration can help prevent sand and debris from being disturbed.
Once the tank is refilled, restart the filter, chiller and other equipment.
Check that:
Water is flowing correctly
The filter has restarted
The chiller is operating
Airline tubing is connected
The temperature probe is positioned correctly
No equipment is leaking
Step 9: Retest When Necessary
If ammonia, nitrite or nitrate was elevated before cleaning, retest the aquarium after the water change.
Ammonia and nitrite should both read 0 ppm.
If either is detectable, the aquarium may be experiencing a disrupted nitrogen cycle, excess waste, filter problems or insufficient biological filtration.
Cleaning the Axolotl Filter
The filter is one of the most important parts of the aquarium.
It houses beneficial bacteria that process ammonia and nitrite. Cleaning it incorrectly can cause a cycle crash.
Never Wash Filter Media Under Untreated Tap Water
Chlorine and chloramine can damage or kill beneficial bacteria.
Instead, rinse dirty sponge or biological filter media gently in a bucket of old aquarium water removed during a water change.
The media does not need to look brand new. The goal is to remove heavy sludge while preserving the bacterial colony.
Do Not Replace All Filter Media at Once
Replacing every sponge, cartridge or biological media component at the same time can remove much of the aquarium’s beneficial bacteria.
If filter media genuinely needs replacing, change only one section at a time and allow the remaining media to support the aquarium.
Some disposable filter cartridges are marketed for frequent replacement, but regularly discarding all mature media can destabilise the tank.
Reusable sponge and biological media are often more suitable for maintaining a stable aquarium cycle.
Clean the Filter When Flow Decreases
A filter does not always need to be cleaned every week.
Clean it when:
Water flow becomes noticeably weaker
The intake is blocked
Sponge media is heavily clogged
Debris is collecting inside the filter
The filter begins making unusual sounds
Overcleaning the filter can be just as disruptive as neglecting it.
The Monthly Axolotl Tank Cleaning Routine
Monthly maintenance should be slightly more detailed, but it should still avoid stripping the aquarium completely.
Check Hides and Decorations
Lift and inspect hides, artificial plants and decorations.
Waste can become trapped underneath them, particularly in low-flow areas.
Clean decorations using old aquarium water and an aquarium-safe brush or sponge.
Do not use soap or household chemicals.
Inspect the Filter Intake and Impeller
Check the filter intake for plant matter, waste or debris.
Depending on the filter design, the impeller may also need occasional cleaning to maintain reliable water flow.
Follow the manufacturer’s instructions and avoid allowing biological media to dry out during maintenance.
Inspect Airline Tubing and Airstones
Check that air is flowing properly through sponge filters and airstones.
Airstones may become blocked over time and may need cleaning or replacement.
Make sure airline tubing is not kinked, cracked or filled with water.
Check the Chiller
Inspect the chiller intake, hoses and pre-filter for debris.
Restricted water flow can reduce cooling performance and place extra strain on the chiller.
Follow the chiller manufacturer’s cleaning and maintenance instructions.
Trim Aquarium Plants
Remove dead or decaying leaves before they break down inside the aquarium.
Healthy live plants can help use nitrate, but decaying plant matter adds additional organic waste.
Choose sturdy, cool-water plants that are suitable for axolotl aquariums.
Should You Remove Your Axolotl During Cleaning?
For routine spot cleaning and small water changes, your axolotl can usually remain inside the aquarium.
Move slowly and avoid chasing or startling them with the siphon.
Temporary tubbing may be helpful when:
Completing major emergency maintenance
Removing a dangerous object
Repairing aquarium equipment
Treating a serious ammonia or nitrite spike
The aquarium cycle has crashed
The tank must be completely emptied for an unusual reason
If tubbing is required, use cool, conditioned water and complete full daily water changes in the tub.
Common Axolotl Tank Cleaning Mistakes
Cleaning Everything at the Same Time
Scrubbing the entire tank, replacing all filter media and completing a full water change on the same day can remove or disrupt beneficial bacteria.
Clean different parts of the system gradually.
Using Soap or Household Chemicals
Even small traces of soap, disinfectant or cleaning spray can be dangerous to aquatic animals.
Use aquarium-only buckets, sponges, brushes and equipment.
Ignoring Nitrate
A tank may look clean while nitrate continues rising.
Clear water does not always mean safe water. Regular testing is essential.
Replacing Filter Cartridges Too Frequently
Throwing away mature filter media can remove beneficial bacteria and destabilise the nitrogen cycle.
Rinse reusable media in old aquarium water whenever possible.
Disturbing the Substrate Too Aggressively
Deeply stirring sand can release trapped debris into the water.
Clean the surface gently and maintain a thin, manageable sand layer.
Adding Untreated Tap Water
Tap water should always be conditioned before it enters the aquarium.
Chlorine and chloramine may harm your axolotl and biological filtration.
Changing Water Temperature Too Quickly
Replacement water that is significantly warmer or colder than the aquarium can create sudden stress.
Match the temperature as closely as practical.
Example Axolotl Tank Cleaning Schedule
Every Day
Remove visible waste
Remove uneaten food
Check the water temperature
Observe your axolotl
Confirm that the filter and chiller are operating
Every Week
Test ammonia, nitrite, nitrate and pH
Complete a partial water change
Siphon visible debris
Clean the aquarium glass if needed
Check equipment operation
Every Two to Four Weeks
Gently rinse clogged filter media in old tank water
Inspect filter flow and intake
Check underneath hides and decorations
Trim dead plant material
Inspect tubing, airstones and chiller pre-filters
Regularly
Test GH and KH
Inspect the aquarium for cracks or leaks
Check electrical cords and equipment
Replace damaged tubing or worn equipment
Review your cleaning routine if nitrate rises too quickly
What to Do if Ammonia or Nitrite Is Detected
Any measurable ammonia or nitrite requires attention.
Begin by:
Removing uneaten food and visible waste.
Checking that the filter is operating correctly.
Completing an appropriate partial water change using conditioned water.
Retesting the aquarium.
Testing daily until ammonia and nitrite return to 0 ppm.
Do not add extra food or additional animals while the aquarium cycle is unstable.
If ammonia or nitrite continues rising, temporary tubbing may be necessary while the aquarium’s biological filtration is restored.
A Clean Tank Is a Stable Tank
The best axolotl cleaning routine is consistent, gentle and guided by water testing.
You do not need to dismantle the aquarium every week or scrub away every trace of natural growth. Removing waste, controlling nitrate, protecting the filter bacteria and maintaining cool, conditioned water are far more important than making the tank look perfectly polished.
Small daily habits prevent large water-quality problems.
Need Help With Your Axolotl Aquarium?
Little Lotl’s Australia stocks axolotl-safe aquarium equipment, water conditioners, beneficial bacteria, testing supplies, filters, air pumps, hides, plants and other freshwater aquarium essentials.
Explore our axolotl care range or contact Little Lotl’s for help building a safe, stable and easy-to-maintain aquarium.


Comments